
Webbing rarely works by itself in a finished product. It may need to pass through a buckle, fold back for sewing, stretch between two fixed points, or hold its position inside an adjuster. This is why we normally want to know how the webbing will be assembled, not only what size webbing you need.
A 25 mm webbing, for example, is not necessarily the right match for a 25 mm hardware slot. The actual fit also comes from thickness, tolerance, softness, and how the webbing needs to move through the hardware. Elastic webbing brings different questions once part of it is sewn or fixed, while jacquard webbing needs its logo to remain in the right place after folding and assembly.
These are the kinds of details we’ll cover on this page: how webbing fits and moves with hardware, how assembly changes length and stretch, what sewing can do to elastic webbing, where assembled strength really comes from, and how jacquard artwork fits into the finished strap.
A 25 mm webbing and a 25 mm buckle sound like an obvious match. Once you put the two together, the fit may tell a different story.
Say the actual buckle opening is 24.8 mm. If the finished webbing is 25.0 mm, you can already see the problem. In one project, trial fitting may show that 24.5–24.6 mm webbing works better with that opening. It doesn’t mean every 24.8 mm buckle needs 24.5 mm webbing. The point is that once the hardware is fixed, we can adjust the webbing around what it actually needs to fit.
Getting the webbing through the buckle is only the first check. If it runs through an adjuster, it also needs to slide when you adjust it and stay in place after you set it. If the webbing folds back through the hardware, we also look at how those layers sit together.
This is why the actual hardware is so useful during webbing development. If you already have it, send a sample or drawing and show us how the webbing runs through it. Tell us whether it needs to move, hold, or fold back. We can then make and trial the webbing against the same assembly you will use.
A hardware size tells us where to start. The actual fit tells us where the webbing needs to finish.
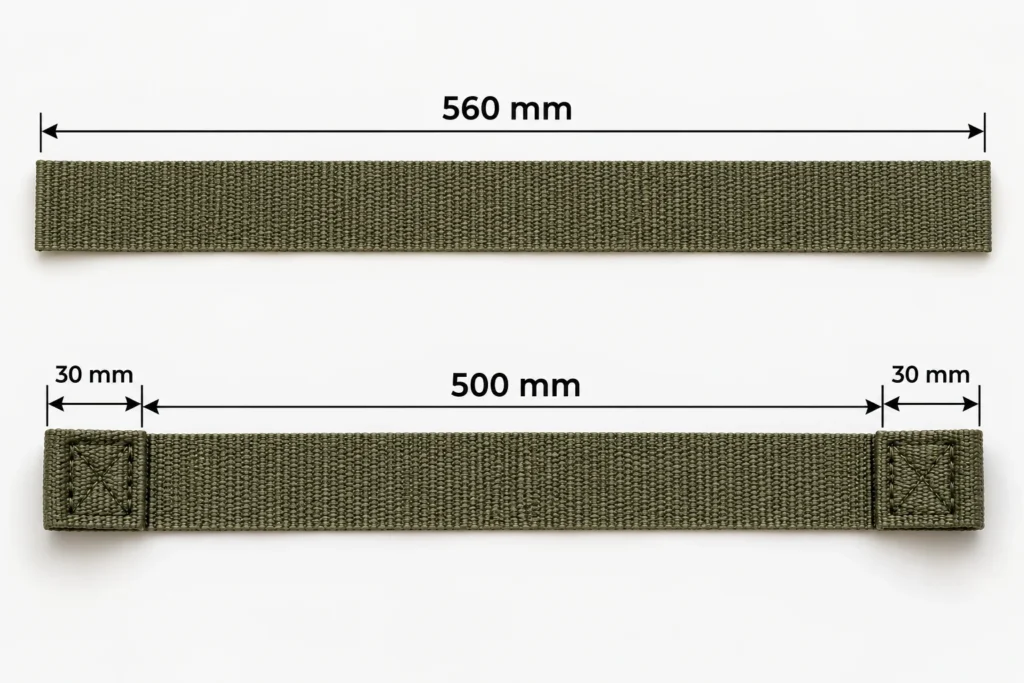
Your webbing cut length needs to include the webbing used in folds, sewing, and hardware routing, so it is often longer than the finished strap length.
Say your finished product needs a 500 mm strap, and 30 mm at each end folds back for sewing. The starting cut length would be around 560 mm before adding any extra webbing used in hardware routing. That gives you a useful number to start sampling with, but it is not the number we would freeze for production yet.
With elastic webbing, we also need to know what 500 mm means. Is that measured while the strap is relaxed or while it is fitted under working tension? If the strap has an adjuster, the more useful requirement may be a working range such as 420–580 mm rather than one finished length.
Once you have the actual webbing and hardware, make one complete strap the same way you plan to assemble it in production. Check the finished measurement or adjustment range, then correct the cut length if needed. That assembled sample gives you a much safer production cut length than working from the finished dimension alone.
If you are buying rolls and doing the assembly yourself, sharing the finished strap dimensions and assembly arrangement with your webbing manufacturer also helps us check the webbing against the way you plan to use it.
Use the calculation to get your starting cut length. Use the actual assembled strap to set the production cut length.
The stretch you measure on a roll of elastic webbing is not the same as the stretch the finished strap actually uses. Once part of the webbing is folded, sewn, or fixed to hardware, the free section between those points does most of the stretching.
Say you cut 500 mm of elastic webbing, but 50 mm at each end is used for attachment. That leaves roughly 400 mm of working elastic section. If the product needs that section to extend another 100 mm in use, it is working at about 25% extension, not 20% based on the original cut length.
But reaching 25% is only half of the story. Two elastic webbings may both stretch to 50%, yet one can feel much firmer than the other at 25% extension. What matters in the finished product is the tension or support the webbing gives at the stretch your strap actually uses.
For example, imagine a wearable strap with 300 mm of free elastic between two fixed points. In use, that section needs to reach 375 mm, so the webbing works at about 25% extension. If the first sample reaches 375 mm easily but feels too loose on the body, increasing the maximum stretch is not the solution. We need more tension around that 25% working point. That may mean adjusting the elastic yarn arrangement or construction while keeping enough stretch for the required movement.
For development, show your webbing manufacturer where the strap is fixed, its relaxed assembled length, and the length it needs to reach in use. If you already have a reference strap with the right feel or support, send that as well. We can measure how it behaves at the working length and develop the elastic webbing around that target.
The assembled sample then tells you whether the strap reaches the required length with the right amount of support—not simply whether the webbing can stretch far enough.
Choose elastic webbing by how it performs at the working stretch of your assembled strap, not by maximum stretch alone.
Sewing can damage the elastic yarns inside elastic webbing. The needle can damage or break the elastane yarn, or pull it out of position as it passes through the woven structure.
This matters when you buy elastic webbing by the roll and do the sewing yourself. The webbing can have the right stretch and look completely fine when you approve it, then be damaged at the attachment area during assembly. Research on woven elastane fabrics has found needle damage concentrated around the stitching area, with the amount of damage changing with the yarn and fabric construction.
The finished seam can also develop its own problems. Puckering is one example. Elastic woven fabrics can extend while they are being sewn and contract again afterward, and the interaction between the elastic fabric, sewing thread and thread tension can leave a seam that no longer lies flat. That is a sewing and seam-balance problem rather than proof by itself that the elastic yarns have been cut.
So when we check a sewn elastic-webbing sample, we look at two things separately: has the needle damaged the elastic structure, and does the finished seam still sit and move correctly? Visible or pulled elastic yarns around the needle line are one warning sign. Puckering or distortion around the seam tells us the sewing setup also needs another look.
If you will sew the webbing yourself, use the actual production webbing during sampling and sew it the same way you plan to in production. Show your webbing manufacturer where the seam will sit and how you plan to sew it, then check the sewn sample before approving the assembly method.
For elastic webbing, a good roll sample is only half the check. The webbing still needs to remain good after you sew it.
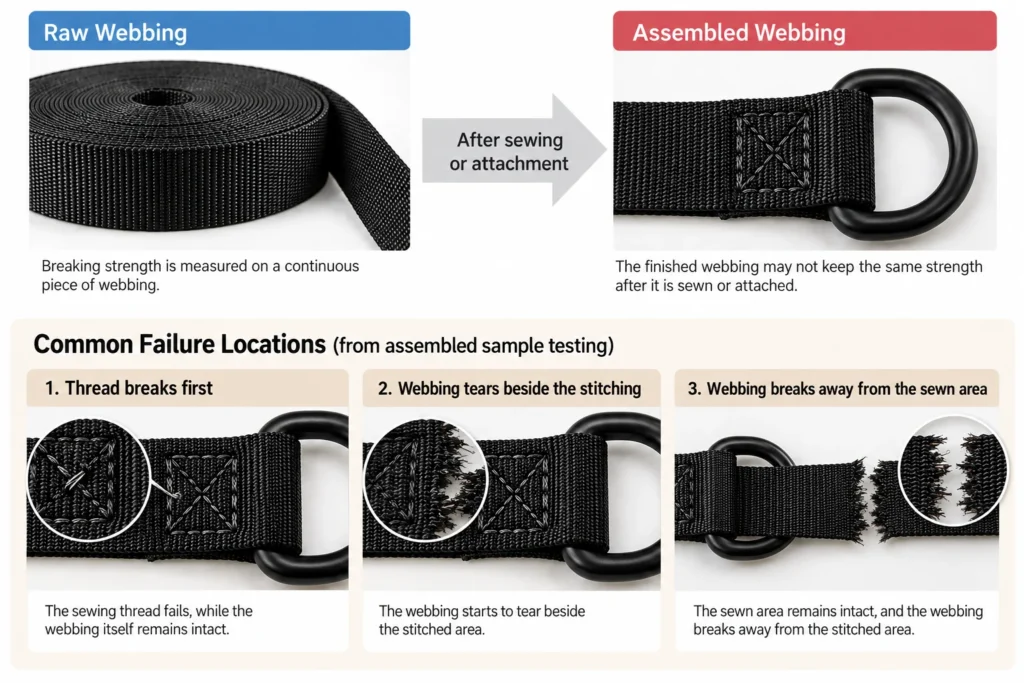
A webbing that passes your breaking-strength requirement on the roll can lose strength after it is sewn into the product. Once there is a sewn connection, how and where the load enters the webbing starts to matter.
When we test an assembled sample, we always look at where it fails, not only the final number. If the thread breaks first, we look at the sewn connection. If the webbing tears beside the stitching, we look at how the attachment is loading the webbing. If it breaks away from the sewn area, the webbing strength itself may be the limit.
For your project, give us the load the finished strap needs to carry and how the webbing will be attached, rather than simply asking for webbing with the same breaking-strength number. We can make the actual connection, test it, and record both the load reached and where it fails.
If the sample falls short, that failure point tells us what to adjust and test again.
For a load-bearing strap, approve the strength after assembly—not only the strength of the webbing on the roll.
A jacquard repeat may need a blank area for cutting, folding, or sewing when the webbing will be made into fixed-length straps. Otherwise, a perfectly woven logo can end up exactly where you need to assemble the webbing.
We see this most often when a buyer gives us a repeating logo first and decides the cutting position later. Say each finished strap needs 300 mm of webbing, with the last 30 mm folded back for sewing. If logos simply repeat through that 300 mm, one of them may land inside the fold or under the stitching.
For this type of project, we can build the assembly space into the jacquard repeat. The logo stays in the area you want people to see, while the section used for cutting, folding, or sewing is left blank. The repeat is then developed around the finished strap instead of treating the webbing as an endless logo pattern.
So if your jacquard webbing will later be cut into fixed-length straps, show us the finished strap length, where it will be cut and folded, and where you want the logo to remain visible. We can use those positions when setting the repeat before weaving.
It is much easier to leave the right space in the repeat before weaving than to find a clean place to cut after the logos are already woven.
When the two sides of your webbing have different jobs, the assembly direction should be decided while the webbing is being developed. Getting every individual specification right is not enough if those specifications end up on the wrong sides.
A jacquard ski goggle strap with one-side silicone is a good example. The finished strap may need the logo facing outward and the silicone facing inward against the helmet. We therefore need to develop those two requirements together:
Side A — Jacquard logo → faces outward
Side B — Silicone grip → faces the helmet
If the logo and silicone are both made correctly but end up on the same side, each requirement is there, but the webbing is wrong for the finished assembly.
For your project, define each side by what it faces or what it needs to do in the finished product, rather than only calling them front and back. Mark that orientation on the assembly drawing or approved sample so the same reference follows the webbing into production.
When you approve the sample, check the relationship between the two sides as one requirement—not the logo and silicone separately.
Once the two sides have different jobs, their relationship becomes part of the webbing specification.
We turn your ideas into webbing, manufacture it, and deliver it straight to your doorstep.
Have your product requirements, specifications, or artwork ready? Share your project with us to discuss the next step in development.
We will contact you within 1 working day, please pay attention to the email with the suffix “@anmyda.com”.